Hardware work has alwasy fascinated me. I grew up with a father who was an electrician, and did a lot of robotics work. So for a long time I grew up with circuit boards all around me. Once I discovered programming and the cloud, I found myself leaving the world of electronics behind for “digital machines.” But then I got connected to Space, and now I’ve got 5 Raspberry Pi’s all running projects in various states, and even started working on my first raspberry pi pico.
So when I started down this road, the first question when you get the raspberry pi pico, is “How do I get started working with this thing?” So here’s a post about setting up your raspberry pi pico development environment.
What is a Raspberry Pi Pico?
For this discussion, Raspberry Pi’s are a line of computers and hardware devices that were designed to create low-power compute that is very cheap and easy to obtain and run. The focus is on making a machine that’s easy to get, setup and can be used for a variety of uses. You can read more RaspberryPi.com.
People use these devices for all kinds of applications, from IoT, robotics, home automation, etc. I personally have 5 different raspberry pis sitting behind my desk.
Here are some videos I’ve seen that do a good job of outlining the uses:
What is a microcontroller?
Now a Raspberry Pi, is a full linux computer on a smaller scale. But even it is more power than you need for IoT work, and working with hardware. Sometimes you only need an computer to act as a brain and route messages and handle conditional logic. Usually you see this in situations where you are dealing with sensors or servos and implementing solutions like that.
Raspberry Pi Pico’s are a microcontroller, which are generally leveraged for these implementations. If you’ve heard of an “Arduino”, which is a competitive product, I have seen both of these be used and honestly they all work.
To give you an idea, most of these Picos run about $4-8 depending on where you buy.
What is the pin diagram for a Raspberry Pi Pico?
Now when you are doing IoT work, you are usually working with a breadboard, which enables using jumpers to make connection. Now for the purposes of my docs, I actually have a Raspberry Pi Pico 1 (documentation).
When you work with this for making connections to sensors, servos, etc. You would look at a pin diagram:
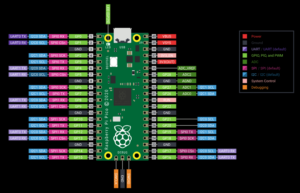
This outlines the pins for working with your application.
Prepping the Microcontroller
So for this to work, first, get your pico and you will see this button, which is the “bootsel” or Boot Select, found in the red box:
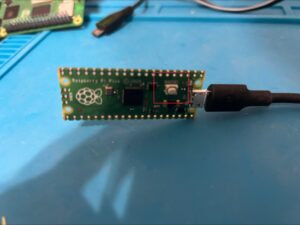
Follow these steps:
- Press and hold Bootsel button.
- Connect USB Cable (connected to your computer)
- Release button
After you do this, you will see the Microcontroller appear as a storage device on your machine.
Next go to the Raspberry Pi Microcontroller site. Find your version of the Pico, and download the uf2 file for MicroPython.
Copy this file to the Microcontroller, and you will the storage device disappear as it picks up the file.
NOTE: Unlike a Raspberry Pi, Pico must be connected to a laptop to code on it.
How do I get started with programming this thing?
So the first part of this process is to get MicroPython installed on the Raspberry Pi Pico. The key part about this is a Pico comes out of the box with tools to code using C++ or MicroPython. I personally am a Python dev at heart (recent convert over the past few years). So I’m going to set it up for MicroPython.
What is MicroPython? It’s a lean version of python specifically built and optimized for Microcontrollers. For more information on this open-source tool, you can find it here.
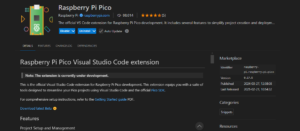
Now, next comes extensions. The preferred IDE is going to be VSCode. So if you don’t have, you can download it here.
There are extensions which you can use to do Raspberry Pi Pico Development. I personally recommend “Raspberry Pi Pico” from Raspberry Pi. The source code can be found on Github.
Once you have that open, you can begin creating a project for the Raspberry Pi pico. Here are some great samples online for applications. raspberrypi/pico-micropython-examples.
I have some fun projects I’ve been working on that will be included in a future post.